CemerMaxLibrary

Add Cemer Products
to 3ds Max
in One Click

CemerMaxLibrary lets you search and find the 3ds Max files of products and add a product's 3D model to your scene with a single button on its card. You see every model's file size before you download it.

  3ds Max 2025 / 2026   Automatic updates
 
Explore
 
CemerMaxLibrary Introduction
Video coming soon


Product Library

What Is CemerMaxLibrary?

CemerMaxLibrary is a product library that opens inside 3ds Max. You search the product catalog and narrow it by category and filters, then bring the 3D model (FBX) of the product you like into your open scene with one click.

The added objects come in selected and can be removed in one step with Ctrl+Z. You can also set up a layout prepared with Cemer Planner from its .cemerzone file with one click. Every card shows the model's file size, so you see large models before you download them.

 
Fast Search and Filters
Search by name or code; capacity, area, fall-height and age filters
 
One-Click Add
The button over the card downloads the model and imports it into the scene
 
File Size in Advance
An MB badge on the card; variant sizes next to their names
 
Favorites
Build your own list with the card's star; your cemer.com favorites show up too
View the Detailed Guide  
Getting Started Is Easy

How It Works

Your product is in the scene in four steps.

 
1

Install

Run the installer and restart 3ds Max. A Cemer menu appears in the main menu bar.

 
2

Open and Sign In

Open the library from Cemer → CemerMaxLibrary and sign in with your cemer.com account.

 
3

Find the Product

Find the product with search, categories and filters; add the ones you use often to your favorites.

4

Add It to the Scene

Press Add to Scene on the card and click the point in the scene where the product should go.


What Can You Do?

Core Features

The library takes over the tedious parts of finding a product and bringing its model into the scene.


Product Catalog

More than 800 products; search by name or code, a category tree and capacity, area, fall-height and age filters.


One-Click Add to Scene

The button that appears over a card downloads the model and imports it into 3ds Max as FBX; the objects come in selected and one Ctrl+Z removes them.


FBX File Size

Every card shows the model's size (e.g. 11.6 MB) so you know how much data is coming before you download it.


Click to Place

Put the product where you click in the scene; the product is placed once. Right-click or ESC cancels.


Safety Area Outline

The product's safety area boundary comes as an orange closed line linked to the product; it moves and rotates with it. It is on its own layer, which you can hide.


V-Ray Materials

The materials of the added products (colour, texture, glossiness, bump, transparency, emission) are converted to V-Ray materials with one option; textures stay linked to the same files.


Variant Choice

Products with several FBX files open a small menu; each variant's size is written next to its name.


Unit and Scale

Choose the model's unit (auto, mm, cm, m) and a scale factor before adding, so it does not land at the wrong size.


Open Your Planner Layout

Pick the .cemerzone file of a layout you prepared with Cemer Planner in AutoCAD; all products are set up in the scene at their positions and orientations, with the area boundary and safety area outlines, in one step.


Favorites

Build your own favorites with the card's star; the favorites on your cemer.com account also appear under Favorites.


Independent Window

The library opens in its own window; it stays behind when you click 3ds Max and comes forward from the Cemer icon on the taskbar.


One-Click Installer

No administrator rights needed; the installer finds the installed 3ds Max 2025+ versions by itself. No drag and drop.


Automatic Updates

When a new version is released an Update button appears in the top bar; it is downloaded, verified and installed without closing 3ds Max.


Turkish and English Interface

Switch the interface language with one click; your choice is remembered and you are not asked to sign in again.


Transparent Data Use

Only limited usage information is recorded; your scene content, file names and password are never collected.

Interface

Everything At Your Fingertips

Product Cards

All You Need to Know, on the Card

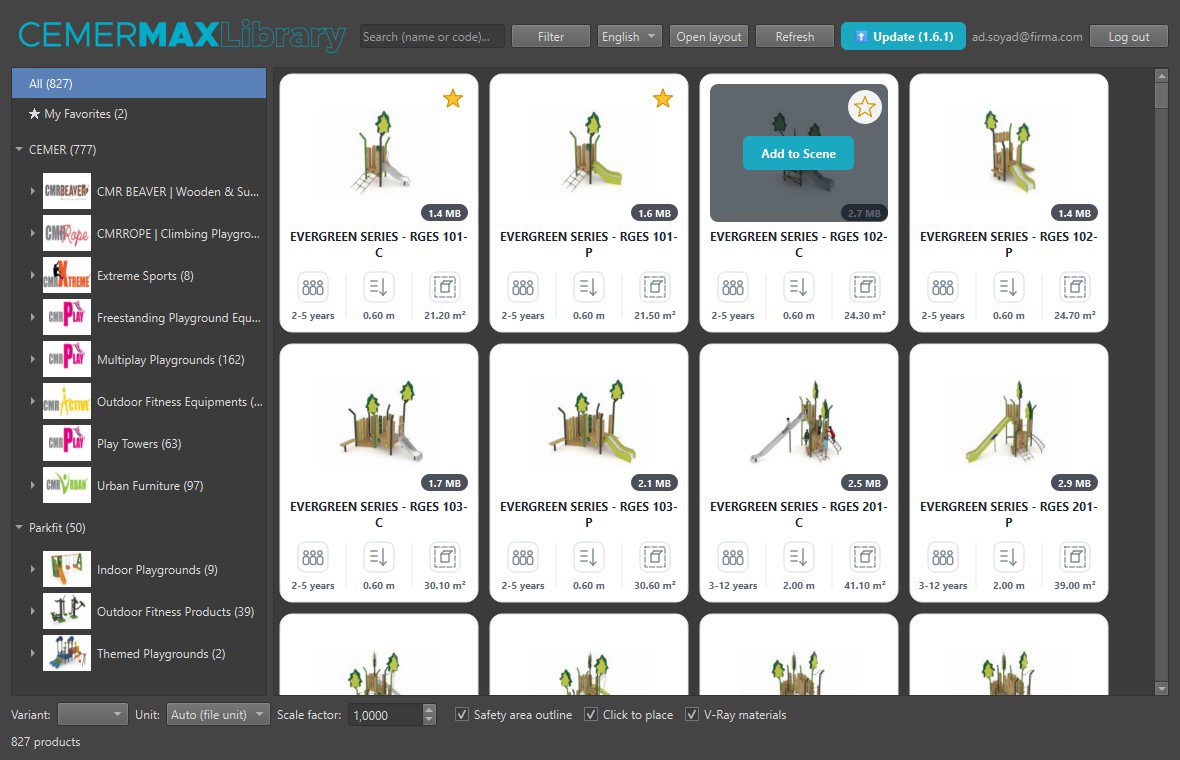
The image, product name, age range, fall height and safety area are visible at a glance. The badge at the bottom right of the image shows the model's file size, and the star at the top right shows its favorite status.

  •   Hovering over a card reveals the Add to Scene button and the favorite star
  •   Products with several variants open a menu that includes the sizes
  •   Downloaded models are kept on your computer; adding the same product again is instant
  •   With the options at the bottom, put the product where you click in the scene and add its safety area outline with it
  •   The Open layout button in the top bar sets up a Planner / CemerZone layout in the scene
  •   A look that fits the dark 3ds Max theme


CEMERMAXLIBRARY
CemerMaxLibrary main window


Get Started

Download CemerMaxLibrary
Now

Download the installer package, run the installer extracted from the ZIP, reopen 3ds Max and sign in with your cemer.com account. New versions are offered inside the application.

A Cemer corporate account is required to use the application. Sign Up / Log In →

 
Windows
Installer package (ZIP)
Windows 10 / 11 (64-bit)
3ds Max 2025 / 2026
No administrator rights needed
  Download for Windows
 
User Guide
PDF
All steps from installation to adding to the scene
Troubleshooting table
Illustrated with screenshots
  Download the Guide
Technical Details

System Requirements


Windows + 3ds Max

Operating System Windows 10 / 11 (64-bit)
3ds Max 3ds Max 2025 or newer (2024 and earlier are not supported)
Installation Single installer; no administrator rights needed
Account cemer.com corporate account
Internet Required for catalog images, FBX models, sign-in and updates
Model Format FBX (unit and scale can be set when adding)
Disk Space Downloaded models are cached (an average model is ~12 MB)
Target Audience

Who Uses It?

Designed for everyone who works with Cemer products in 3ds Max.


3D Visualization Artists

Bring product models straight into your scene without browsing the catalog elsewhere, and move on to rendering and presentation quickly.


Architects and Landscape Designers

Add playground products to your project; with the unit and scale settings the models arrive at the right size.


Project and Sales Teams

Quickly bring up-to-date Cemer products into the scene for customer presentations, and see the model size beforehand.

Frequently Asked Questions

What You Wonder

Which 3ds Max versions are supported?

CemerMaxLibrary works with 3ds Max 2025 and later. The interface runs on the PySide6 that ships with 3ds Max 2025, so it does not open in 2024 and earlier.

In what format and where are the models added?

Models are imported as FBX. By default you put the product where you click in the scene (placed once; right-click / ESC cancels); with “Click to place” off the model is added at the position stored in its file (usually the scene origin). The last added product comes in selected; if it was a mistake, Ctrl+Z undoes it.

What is the safety area outline?

The product's safety area boundary is added to the scene with the product as an orange closed line linked to the product's object; when you move / rotate the product the line follows. It is on the “Cemer Güvenlik Alanı” layer; you can hide it or not add it at all with the “Safety area outline” check box at the bottom.

How do I see the file size?

The model's size (e.g. 11.6 MB) is shown at the bottom right of each card's image. For products with several variants, each variant's size is shown next to its name.

Are the materials converted to V-Ray?

Yes. If V-Ray is installed the “V-Ray materials” box at the bottom is on by default; the products' materials are converted to VRayMtl as they are added (colour, texture, reflection glossiness, bump, transparency, emission). If V-Ray is not installed the box is disabled and the materials come in as they are.

The model comes out far too large or small in the scene. What should I do?

Pick the right unit (millimeters, centimeters, meters) from the Unit list at the bottom of the window or enter a Scale factor, and add the product again.

Do I need administrator rights to install?

No. The installer writes to user folders and finds the installed 3ds Max 2025+ versions by itself. After installation you only need to restart 3ds Max.

How do updates arrive?

When a new version is released an Update button appears at the top of the window. When you click it, the package is downloaded, verified and installed; 3ds Max does not close. The new version takes effect when you reopen the library.

Can I bring a layout I made in Planner into 3ds Max?

Yes. Save the .cemerzone file in Planner with “CEMERZONE Export”; in 3ds Max pick the file with the Open layout button in the top bar of CemerMaxLibrary. The products are downloaded and set up at their positions and orientations; the area boundary comes in as a closed spline. The whole thing can be undone in one step.

How do favorites work?

Products you add with the card's star are stored on this computer; the favorites on your cemer.com account also appear under Favorites. cemer.com favorites are managed on the website.

What information does the application record?

To improve the service, your e-mail address, the library / 3ds Max / Windows version, language, the code and quantity of the products added to the scene and shortened error messages are recorded. Your scene content, file names and password are not collected. See our privacy policy for details.

How do I remove it?

Run the installer with the /REMOVE=1 /VERYSILENT parameters; the library and the menu script and icons copied into the 3ds Max folders are deleted. See the guide for details.

Can I get technical support?

Yes. You can reach the Cemer technical support team through the contact form. Please mention the version number in the window title.