
CEMERPLANNER AutoCAD Add-in

Plan Your Area
Automatically
Inside AutoCAD

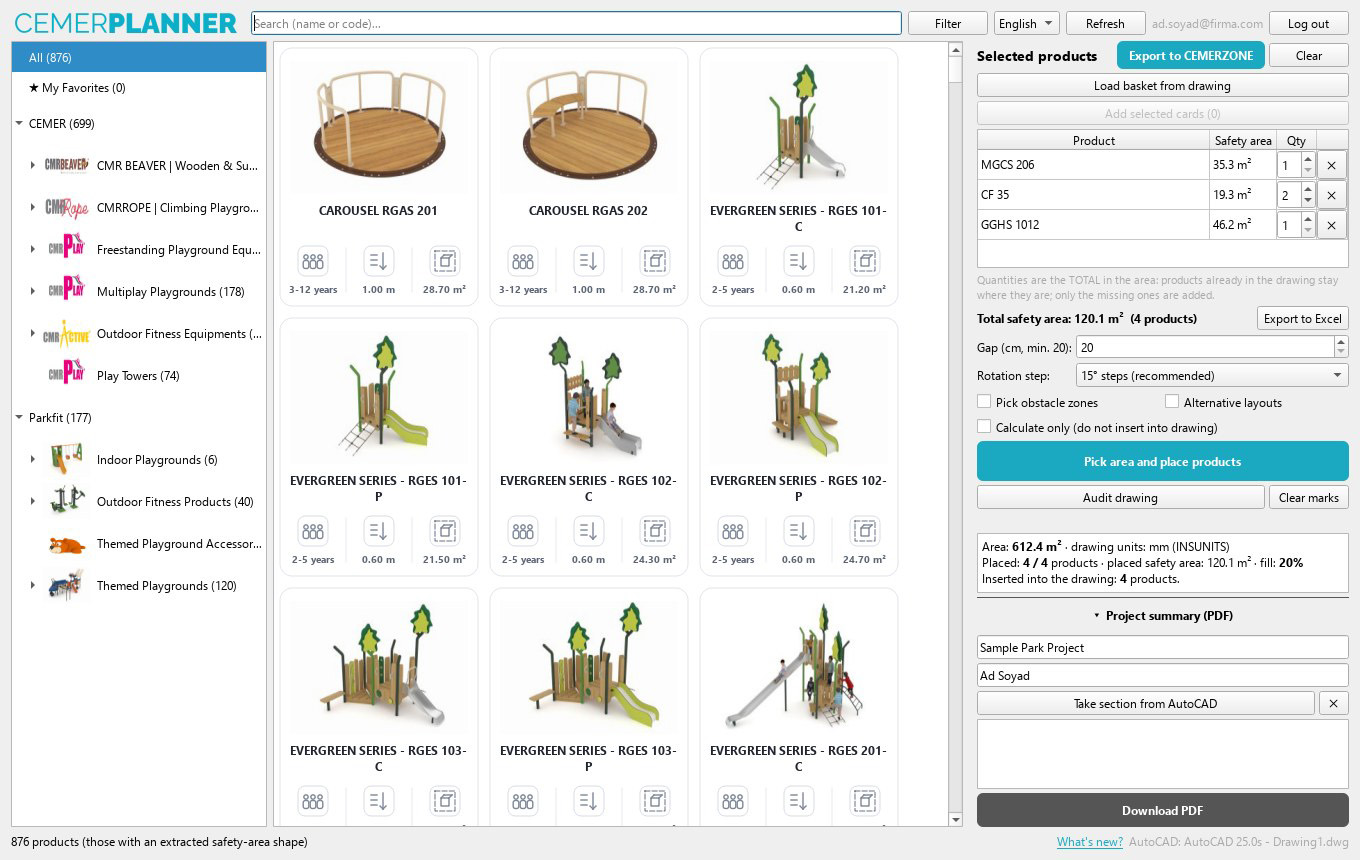
Cemer Area Planner places the products you select inside the area you draw according to their safety zones, without overlaps, prepares a PDF project summary in one click, and lets you open the layout in 3D in CemerZone.

  AutoCAD 2025 / 2026   cemer.com corporate account   Automatic updates
 
Explore
876
Placeable Products
360°
Layout at Any Angle
PDF
Project Summary
3D
Export to CemerZone
 
Cemer Area Planner Introduction
Video coming soon


Area Planning Tool

What Is Cemer Area Planner?

Cemer Area Planner is a planning assistant that works inside AutoCAD. You point at a closed area you have drawn, and the program arranges the products you selected inside it as efficiently as possible, based on their safety zones, without overlapping each other or the boundary.

Products already in the drawing stay where they are; only the missing ones are added. You can document the resulting layout as a PDF project summary and view it in 3D in CemerZone with one click.

 
Safety-Zone Check
Each product's real safety-zone outline is used
 
Any-Angle Placement
Products are rotated to fit the shape of the area
 
PDF Project Summary
Product list, dimensions, plan and sections in one file
 
3D Export
The layout opens as a CemerZone project
View the Detailed Guide  
Getting Started Is Easy

How It Works

Plan your area in four simple steps.

 
1

Draw the Area

Draw the area you want to fill in AutoCAD as a closed polyline (a rectangle, circle or free shape). You can draw more than one area.

 
2

Choose Products

Find products with search, categories and filters, add them to the basket and set the quantities. You can also load the products of a previously worked drawing into the basket with one click.

 
3

Place Automatically

Point at the area; the program tries every angle to find the best layout and inserts the products' DWG blocks into the drawing. Existing products are preserved.

4

Document and View in 3D

Get the PDF project summary in one click, or save the layout as a CemerZone file and review it with the products' 3D models.

 
Step-by-Step Video
Video coming soon


What Can You Do?

Core Features

The Planner takes over the tedious parts of area planning so you can focus on the design.


Automatic Placement

Products are rotated at any angle to fit the shape of the area, with their safety zones neither overlapping nor crossing the boundary. A minimum 20 cm clearance is kept.


Keeps Existing Products

Products already in the drawing stay in place; only missing quantities are added. Running it again with the same basket changes nothing.


Obstacle Zones

Pick trees, buildings, kiosks, paths and similar zones in the drawing; products are never placed on top of them and clearance is kept around them.


Alternative Layouts

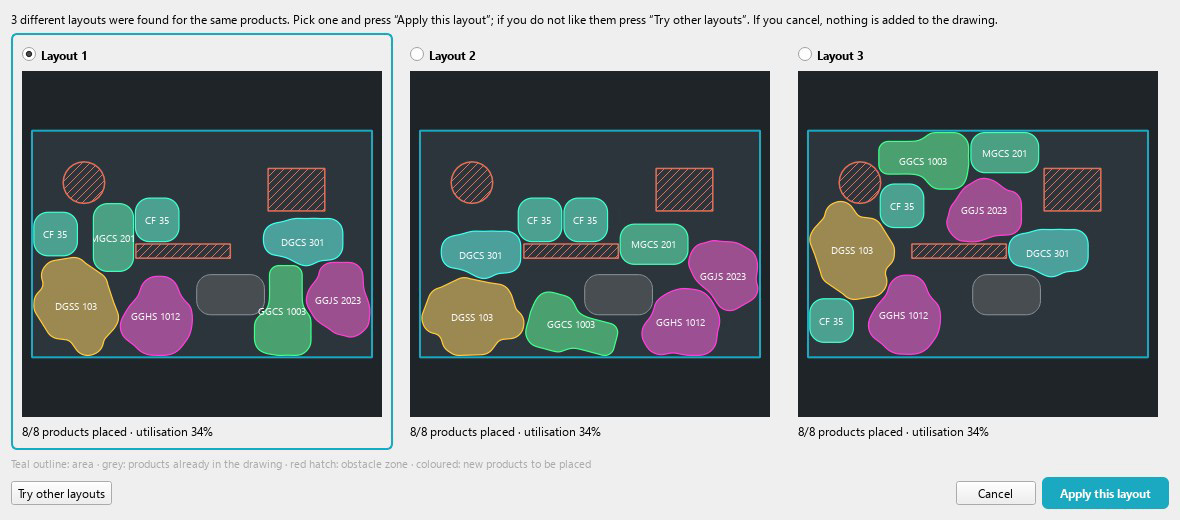
See three different layouts for the same basket as small plans and pick one. Nothing is added to the drawing until you do.


Drawing Audit

Finds safety-zone overlaps and products crossing the area boundary in layouts placed by hand and marks them red in the drawing.


Quantity List

Save the basket with product code, name, quantity and safety area as Excel or CSV: a ready list for preparing quotes (no prices).


Load Basket from Drawing

Pick an area in a previously worked drawing and its products come into the basket with their quantities. Add to the current basket or start over from scratch.


Multiple Areas

Design several areas in one drawing. In the PDF summary each area gets its own plan page; in CemerZone they come in as one project.


PDF Project Summary

A professional PDF with a document number, product images, dimensions and links to product pages, together with the layout plan and AutoCAD sections.


3D Export to CemerZone

Products appear in CemerZone with their 3D models, in exactly the same position and orientation as in AutoCAD.


Self-Updating Product Data

When Cemer adds a product or corrects a safety zone, the data is fetched from the server in the background; no reinstall is needed and startup is not slowed down.


Automatic Program Updates

When a new version is released the program tells you; with one click it is downloaded, verified, installed and reopened by itself.

Outputs

From Drawing to Presentation

Planning

Choose the Layout You Like

Show obstacles such as trees, buildings or paths inside the area. The Planner prepares three different layouts for the same products; you decide which one you want.

  •   Each layout is drawn as a small plan: the area, obstacles, existing and new products
  •   Nothing is added to the drawing until you choose; you can cancel or ask for other layouts
  •   All layouts pass the same exact safety check


ALTERNATIVE LAYOUTS
Alternative layouts window
Project Summary

One-Click PDF Report

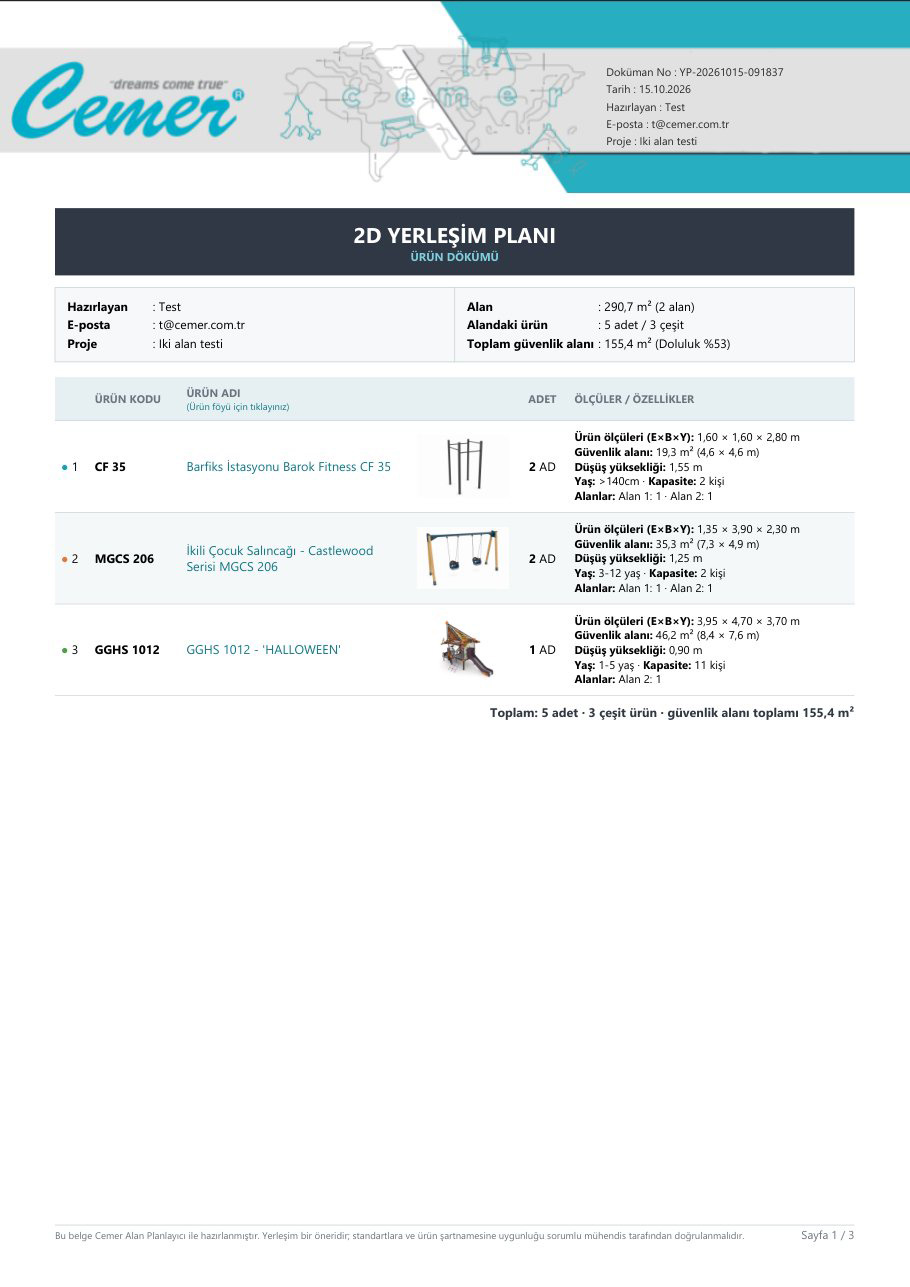
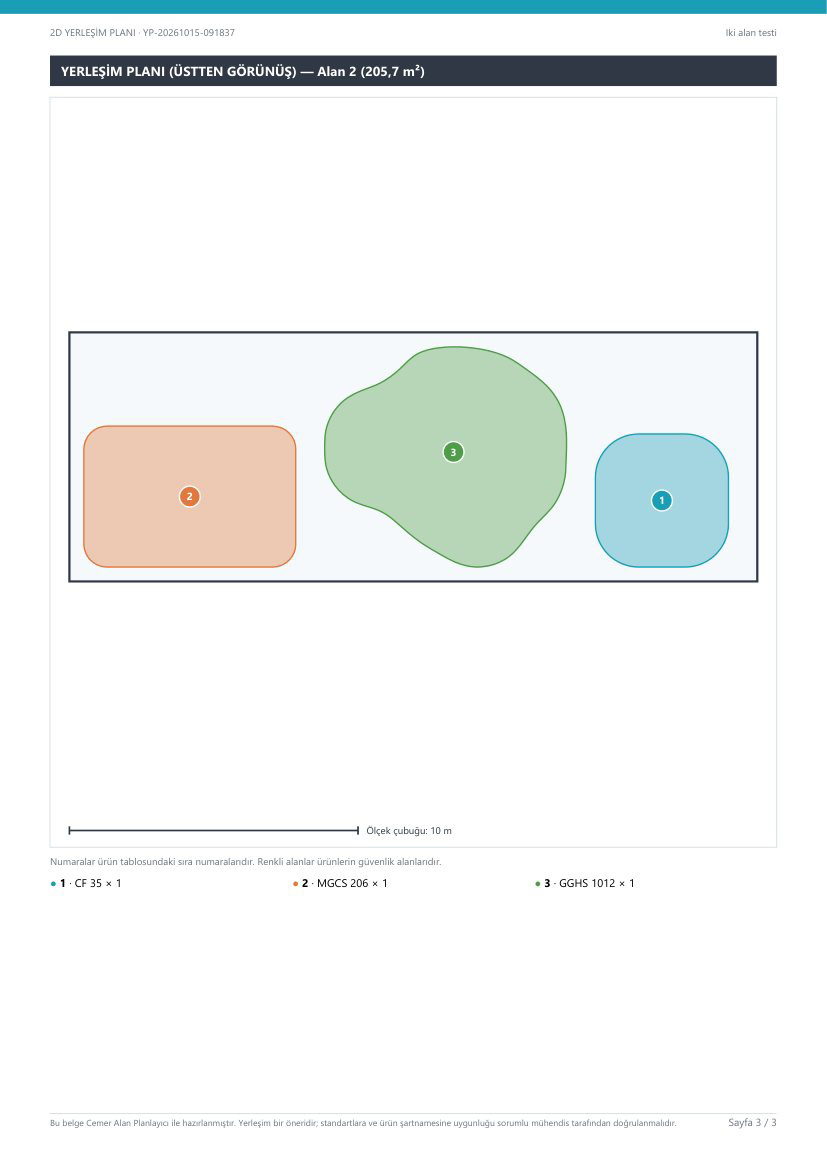
As soon as the placement is done, get a presentation-ready PDF. The report contains the product list, dimensions, clickable links to the product pages and a scaled layout plan. With several areas, each area is shown on its own plan page.

 
Document Number
Every report is numbered automatically
 
Dimensions and Safety Area
W × L × H, m² and extents
 
Product Links
Clickable links to the product pages
 
AutoCAD Sections
Add the views you choose to the report
PDF project summary page PDF layout plan page

Sample output

2D → 3D

Open It in CemerZone in 3D

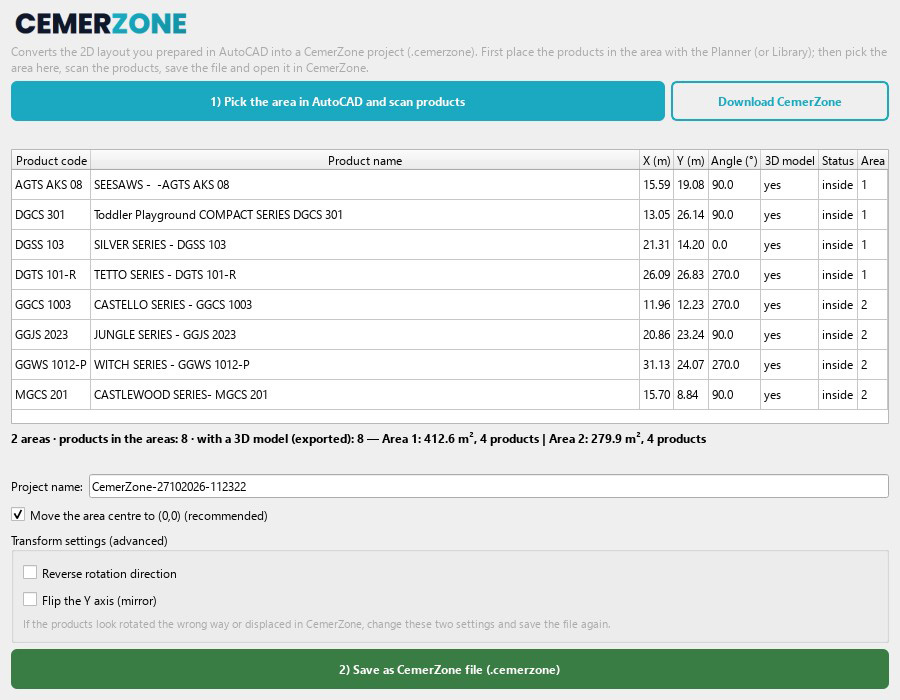
With “CEMERZONE Export” turn the AutoCAD layout into a CemerZone project. Each product appears with its 3D model at its AutoCAD position and orientation; multiple areas arrive in a single project as separate layers.

  •   Exact placement thanks to per-product calculated position and rotation offsets
  •   Also valid for products placed at any angle
  •   Products without a 3D model are listed with a warning
  •   If CemerZone is not installed, the “Download CemerZone” button in the window takes you to the download page
  Meet CemerZone


CEMERZONE EXPORT
CEMERZONE Export window


Get Started

Download Cemer Area Planner
Now

Download the installer, reopen AutoCAD and sign in with your cemer.com account. New versions are offered automatically inside the application.

A Cemer corporate account is required to use the application. Sign Up / Log In →

 
Windows
Installer package (ZIP)
Windows 10 / 11 (64-bit)
AutoCAD 2025 / 2026
Double-click the installer extracted from the ZIP
  Download for Windows
 
User Guide
PDF
All steps from installation to CemerZone export
Troubleshooting table
Illustrated with screenshots
  Download the Guide
Technical Details

System Requirements


Windows + AutoCAD

Operating System Windows 10 / 11 (64-bit)
AutoCAD AutoCAD 2025 or 2026 (running, with a drawing open)
Drawing Unit Millimetres (or unitless)
Area Drawing Closed polyline, spline, ellipse, rectangle or circle
Account cemer.com corporate account
Internet Required for the catalog, product files and updates
Product Data Updated automatically in the background
3D Export CemerZone application (products must have a 3D model)
Target Audience

Who Uses It?

Designed for everyone involved in the playground planning process.


Architects

Quickly place products in your AutoCAD drawings and add the scaled plan and product list to your project.


Landscape Designers

Combine your green-space and playground designs and make sure safety zones never overlap.


Project and Sales Teams

Faster proposals and approvals with a presentation-ready PDF summary and a CemerZone 3D view.

Frequently Asked Questions

What You Wonder

Cemer Area Planner works with AutoCAD 2025 and 2026. The application connects to AutoCAD, so AutoCAD must be running with a drawing open.
No. No placement whose safety zone crosses the boundary or overlaps another product is added to the drawing; every layout also goes through an exact geometry check. At least 20 cm of clearance is kept between products and at the boundary.
No. Products in the drawing stay where they are, nothing is placed on top of them, and only missing quantities are added. Do not explode the product blocks; exploded blocks are not recognised.
Yes. You can run placement for each area, include all areas in the PDF project summary and export them to CemerZone as one project with several areas.
Products must have a 3D model (FBX); products without one are not exported and are listed with a warning. You then open the exported .cemerzone file in the CemerZone application.
The result is a layout proposal. Compliance with standards (e.g. EN 1176) and product specifications must be verified by the responsible engineer.
No. Product data (the catalog, safety-zone shapes and CemerZone settings) is updated from the server in the background after the program starts and does not slow startup. The new data takes effect on the next launch or with the Refresh button at the top of the window.
Yes. Tick “Pick obstacle zones”; after picking the area you also pick the obstacle zones (closed polyline or circle) in AutoCAD. Products are never placed on top of them and clearance is kept around them.
Yes. The “Export to Excel” button saves the basket with product code, name, quantity and safety area (m²) as .xlsx or .csv. The list contains no prices.
To improve the service, your e-mail address, the program and AutoCAD version, feature use, product codes and quantities, and search terms that found no product are recorded. Your drawing content, file names, coordinates and password are not collected. See our privacy policy for details.
Yes. You can reach the Cemer technical support team through the contact form. The detailed user guide can be downloaded as a PDF.

Plan your next project in minutes

Draw the area, pick the products; the Planner prepares the layout, the PDF summary and the 3D view.